 This month I participated in my first card swap, which was coordinated through Stampin' Stacy at RubberStampChat.net. The swap had a safari theme and the finished product was to be a post card (meaning, no layers, glitter, etc.) This card is the finished product and it combines stamping, Stamp-N-Foil, chalks, and embossing.
 For the giraffe: a safari themed animal stamp, 1 quick drying ink pad in a dark color (StazOn in Timber Brown), and blending chalks.
For the center foil section: 1 roll of your favorite color of Stamp-N-Foil (Copper Penny), 1 jar of Stamp-N-Foil bonding powder, 1 VersaMark watermark stamp pad, an animal print stamp, a piece of 8.5" X 6.5" copy paper, and a laminator (you can also use a household iron, please see tutorial below for further instructions).
For the right side: Your VersMark watermark stamp pad, blending chalks, 1 pigment ink pad in any color (Scarlet), any kind of postage or travel type stamp, and a heat tool.
Miscellaneous: Card stock cut to 3.5" X 5", a non-stick craft sheet, and your secret weapon (a stamping mat).
 Place your non-stick craft sheet on top of your stamping mat.
 Ink your animal print stamp with a VersaMark watermark stamp pad (you could also use any color pigment ink for this step). We're going to be applying Stamp-N-Foil bonding powder to the stamped area, so make sure you get your stamp nice and juicy.
 Stamp your image onto your card. Make sure you stamp on a stamp mat to get nice clean edges. I've been told that stamp mats are a stamper's Secret Weapon...and I believe it.
Tap off any excess powder. You can also flick the card from the back to remove any stubborn pieces of powder that don't seem to want to "tap" off. Remember, wherever the powder is, the Stamp-N-Foil will stick.

Heat set the Stamp-N-Foil bonding powder with your heat tool until it becomes glossy.

Lay a piece of Stamp-N-Foil over your stamped image.

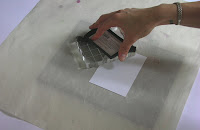
Cover then entire card with a piece of color copy paper. This is going to protect the foil as it goes through the laminator.
If you don't have a hot laminator don't worry, we've got you covered! Just scroll down to view the tutorial entitled "Apply Stamp-N-Foil with your household iron!"

Feed the card through the laminator.
 After the card feeds through the laminator, remove the piece of copy paper.
 Starting at one end, peel the foil off of the card. The pattern of the stamp will now be covered in foil. Now we're ready to move on to the left side of the card with the giraffe.
 Ink up your safari animal stamp with a dark colored, quick drying ink. I'm using StazOn in Timber Brown.
 Stamp your image near the center of the left side of the card.
Using the blending chalks, color in the rest of your scene. Now we're ready to move on to the right side of the card with the animal pattern on it.
 In this step, we're going to use another animal print stamp to create an overall pattern on the right half of the card. Ink up your stamp with a VersaMark watermark stamp pad and make sure it's nice and juicy.
 Stamp the animal print on the right half of the card making sure that you cover the entire area.
While the ink is still wet, use your blending chalks to color over the entire right side of the card. The areas of wet ink will show up darker than the background.

When you're done coloring the right half of the card, it should look something like this. Now we're ready to add a fun travel/safari detail. I've chosen a stamp of a postage stamp (confusing, right?) with the words "World Traveler" on it.
 Using a pigment ink in a coordinating color (I'm using ColorBox in Scarlet) ink up your safari/traveler stamp and make sure it's nice and juicy.
 Stamp your image somewhere on the right half of your card. Since my stamp looks like a postage stamp, I put it all the way up in the upper right hand corner.
 Sprinkle clear embossing powder over the stamped image.
 Tap off any excess powder. You can also flick the card from the back to remove any stubborn pieces of powder that don't seem to want to "tap" off.
  Heat set the embossing powder using your heat tool just until the powder raises and becomes glossy.
Stamp-N-Foil, Stamp-N-Foil bonding powder, and clear embossing powder: all available at www.stampee.net.
Giraffe Animal Stamp: from the "African Animals Kit" by Rubber Stampede
Giraffe pattern stamps: from "Simply Safari" Perfectly Clear Stamps by Stampendous!
World Traveler stamp: by Inkadinkado


No comments:
Post a Comment